Need a quick, handmade Mothers Day gift?
Try this gorgeous Kids Handprint Canvas Picture!
This came together in about an hour and it was a great Mothers Day gift for my mother-in-law.
Handprint idea was inspired by this post.
Kids Handprint Picture Supplies:
- 16″ x 20″ canvas (you can use any size, but I used this size for four handprints)
- Book pages (I got a novel from the dollar store and have used its papers for multiple projects!)
- Acrylic paints (I used a light pink)
- Vinyl letters
- Mod Podge
- Foam brush
- Wide paintbrush
- Scissors
- A few pieces of coordinating scrapbook papers
- Quick-Drying Liquid Glue
- Black ballpoint pen
- Black Sharpie marker
- Pencil
- Pop Dots
- “Distress Ink” ink pad (optional)
- hair dryer or a heat drying gun (optional)
- Your child(ren)’s hand(s)
Kids Handprint Picture Instructions:
Rip the book pages into various size strips.
Apply the strips to the canvas using Mod Podge (apply Mod Podge to the canvas using a foam brush; lay the paper on top and then generously apply more Mod Podge).
Work in one area of the canvas, overlapping the papers as necessary to entirely cover the canvas in book page paper. Allow to dry (use the hair dryer or heat gun to speed up the drying time).
When the surface has dried, apply the vinyl letters to the canvas. Run your fingers over the letters a few times to make sure that the letters are really stuck down.
Apply a light layer of paint over the entire canvas (yes, over the letters), leaving some spots more saturated than others. This gives visual texture and depth.
Allow to completely dry (use the dryer to help it along). This picture above was taken right before I painted the letters.
Once the paint has dried, carefully peel off the letters, doing your best to not also remove the paper underneath. If you do, it’s no big deal. It just adds to the rustic, distressed look.
You will be left with the negative impression of the letters. If some of the paint has bled through, no worries. Again, more character (“uh, yeah… I meant to put paint there…”).
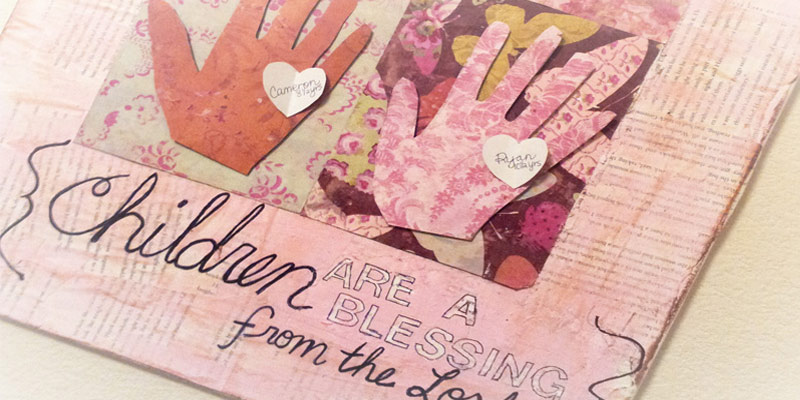
Trace each child’s hand on a piece of scrapbook paper, and cut the traced hands out.
Cut out a rectangle piece of paper that is approximately 1/2″ inch wider on all sides than your biggest handprint. Cut out as many rectangles as you have handprints. I have four kids so I cut four rectangles to go with the four handprints.
All of the rectangles should be the same size, even if the handprints are not.
Arrange the boxes on the canvas, either in a line or in a box shape like this. Use the Mod Podge (under the paper and on top of the paper) to glue the paper to the canvas.
Affix the handprints to the rectangular squares. I used Pop Dots to give a more 3-D look, but you can also use Mod Podge.
Draw a symmetrical heart and cut it out. Use this as a template to draw the rest of your hearts (one for each handprint).
Write the child’s name and age on each heart.
Fold the heart in half and add a line of liquid glue to the back of the heart.
Using a ballpoint pen, trace the outside of the negative space from the white vinyl letters.
Draw any other words (if applicable) with pencil and then trace with a Sharpie.
I also lightly rubbed a “Distress Ink” inkpad over the canvas to give it a distressed look (you can see this better in the final picture).
You’re all finished! Look at that… totally cute!
I’d love to hear how yours turns out! Let me know in the comments!
